
I have wanted to learn how to make potstickers for such a LONG time. I was so excited by this challenge. Thank you, thank you, thank you!
I have to say, my finished product was not very pretty, but they tasted good, AND I had fun. It took a long time to get them all done.
I started by making the wrapper dough. AS it was resting I began to make the filling. I used a little bit of this and a little bit of that. Basically I just opened the fridge, freezer, and pantry and found what I could use up.
I used some ground pork, carrots, spinach, garlic, egg, soy sauce, sesame oil, cornstarch. Maybe some other things too. I did it in a frenzy, so I don't much remember what I was throwing in there. From the picture it looks like I also added some teriyaki sauce, chardonnay salt, cilantro bullion and onion bullion.


 I then began to roll out the wrappers. Then used a Tablespoon to scoop the filling into the wrapper.
 I began to fold them. It took a bit to get the hang of it. It took awhile to get the wrappers thin enough. I played with a couple of different ways to fold them up. Some worked better than others.

I froze these dumplings to use at a later time. Here they are after freezing individually, but before I bagged them.

A few days later I did finally cook some up for dinner. I made a simple dipping sauce with soy sauce, sesame oil.


I thought they turned out a bit salty, Hubbs thought the dipping sauce was salty. Regardless, they were pretty good.
After I had used-up all the pork filling I still had a good amount of wrapper dough left. So I decided to try something fun. I thought about a dessert filling, but honestly at that moment I was hungry and wanted something savory.
I took some cottage cheese and drained it a bit. Added cilantro and a little cornmeal. (the cornmeal was to thicken it up a bit.)

I made the dumplings, pan fried them and served them with som avacado and lemon. They were SOOOOOOOO good. I think the best thing I have eaten in a long time. Granted, I may have been really hungry, but I think they were just really good.

The Recipe as I received it.
It's a basic concept: a filling inside a dough wrapper, sealed, and cooked. This delicious theme runs through many cultures and is among the more popular bites at Chinese restaurants - especially dim sum. The recipe I provide is based on my family recipe. There is a lot of wiggle room and I encourage you to explore. If you've made them before - great! Now try something different!
The process goes a little like this:

You can (and should) reference instructional photos and discussion on my blog post here.
Wrappers: Well yes, you could purchase pre-made dumpling wrappers at the store (NO WONTON WRAPPERS - they have egg), but they are inferior compared to homemade. The whole point of this challenge is to make the dumpling wrappers by hand. So here is the one requirement: the dumpling wrappers must be made by hand. It isn't all that hard, it just takes a little time and practice. People usually get the hang of it after making about a dozen. **NOTE: I have a special recipe for gluten-free dumpling wrappers at the bottom of the post. They are another type of traditional dumpling and they are pretty awesome (although more finicky). Really delicious too, so you may want to have a looksee even if you aren't gluten-free. [EDIT 5/18/09:] I see that some have chosen to make the wrappers by hand. I don't recommend this method because the wrappers will be too thick and probably yield far fewer dumplings for the dough recipe. The point of rolling the dough is for uniformity of wrapper and to achieve a thickness that is otherwise difficult to attain by hand. Also, rolling is much faster than hand shaping. We're aiming for a delicate skin that does not dominate the dumpling.
Fillings: the beauty of the Chinese dumpling/potsticker is that the filling is very versatile. That's why there are so many different kinds of dumplings when you go to dim sum. The two most common are pork and shrimp. You can make them with other ground meats (beef, chicken...) or vegetarian (tofu, mushrooms, bamboo shoots, water chestnuts, glass noodles, Chinese chives - oh yum!). The important thing to keep in mind is that the filling needs to "stick" to itself or else you will make your life incredibly miserable wrapping up filling that keeps falling apart. I think if I were to make vegetarian dumplings, I would sauté the cabbage and mash up the tofu for a better cohesiveness. It's up to you how you want to fill your dumplings and I say - run with it! Just keep it cohesive and no big chunks of hard ingredients (they poke through the wrapper dough = disaster). I realize it may be tempting to dump all of the vegetables into a food processor and give it a whir, but I caution against it. You don't want a slurry, you want a mince. Practice your knife skills and be careful.
Special Equipment: A rolling pin - preferably not tapered. (see blog pictures for the type I use).
Time: Prep for the filling takes me 30 minutes - longer if peeling and de-veining shrimp. It will depend on your proficiency with a good sharp knife. Rolling and wrapping several dozen dumplings takes me 1 hour by myself. My parents can crank through it in 30 minutes when one person is rolling wrappers and the other is wrapping dumplings. Might be fun to get a second person to help! Cooking: I have to cook mine in batches. When steaming, I can cook a dozen at a time in about 10 minutes. Potstickers: 15 minutes per 2 dozen determined by the size of your pan. Boiling - 6 minutes per dozen or so depending on size of pot. My own personal preference is for potstickers - mmmmm! But they are ALL good. Here is the recipe:
Chinese Dumplings/Potstickers
pork filling:
1 lb (450g) ground pork
4 large napa cabbage leaves, minced
3 stalks green onions, minced
7 shitake mushrooms, minced (if dried - rehydrated and rinsed carefully)
1/2 cup (75g) bamboo shoots, minced
1/4 (55g) cup ginger root, minced
3 tbsp (40g) soy sauce
2 tbsp (28g) sesame oil
2 tbsp (16g) corn starch
OR
shrimp filling:
1/2 lb (225g) raw shrimp, peeled, deveined, and coarsely chopped
1/2 lb (225g) ground pork
3 stalks green onions, minced
1/4 cup (55g) ginger root, minced
1 cup (142g) water chestnuts, minced
1 tsp (5g) salt
3 tbsp (40g) sesame oil
2 tbsp (16g) corn starch
dough: (double this for the amount of filling, but easier to make it in 2 batches - or just halve the filling recipe)
2 cups (250g) all-purpose flour
1/2 cup (113g) warm water
flour for worksurface
dipping sauce:
2 parts soy sauce
1 part vinegar (red wine or black)
a few drops of sesame oil
chili garlic paste (optional)
minced ginger (optional)
minced garlic (optional)
minced green onion (optional)
sugar (optional)
Combine all filling ingredients in a large mixing bowl and mix thoroughly (I mix by clean hand). Cover and refrigerate until ready to use (up to a day, but preferably within an hour or two).
Make the dough, Method 1: Place the flour in the work bowl of a food processor with the dough blade. Run the processor and pour the warm water in until incorporated. Pour the contents into a sturdy bowl or onto a work surface and knead until uniform and smooth. The dough should be firm and silky to the touch and not sticky.[Note: it’s better to have a moist dough and have to incorporate more flour than to have a dry and pilling dough and have to incorporate more water).
Make the dough, Method 2 (my mom’s instructions): In a large bowl mix flour with 1/4 cup of water and stir until water is absorbed. Continue adding water one teaspoon at a time and mixing thoroughly until dough pulls away from sides of bowl. We want a firm dough that is barely sticky to the touch.
[EDIT: 5/26/09] There have been two complaints posted about a dry dough and I realize that this rests in the problem of measuring flour which has a different density and hence weight for 2 cups depending on how you scoop it. That is why I also list the weight: 250g. Flour tends to settle over time, so when I scoop it out, I shake several cups' worth back into the container before taking a final scoop of soft, fluffy, flour and I get 250g for 2 cups. When you knead the dough, if it feels hard and dry, then you can add more water. [Warning: it will NOT be a soft bread dough, so don't expect it to be, but it shouldn't be a brick either.] It is perfectly fine to use more than the 1/2 cup listed in the recipe as everyone's climate and flours vary. Use your judgment - this is what being a Daring Cook is about. We are trying to cultivate a sense of intuition so that recipes are general guidelines from which you can expand your own style.
Both dough methods: Knead the dough about twenty strokes then cover with a damp towel for 15 minutes. Take the dough and form a flattened dome. Cut into strips about 1 1/2 to 2 inches wide. Shape the strips into rounded long cylinders. On a floured surface, cut the strips into 3/4 inch pieces. Press palm down on each piece to form a flat circle (you can shape the corners in with your fingers). With a rolling pin, roll out a circular wrapper from each flat disc. Take care not to roll out too thin or the dumplings will break during cooking - about 1/16th inch. Leave the centers slightly thicker than the edges. Place a tablespoon of filling in the center of each wrapper and fold the dough in half, pleating the edges along one side (see images in post for how to fold pleats). Keep all unused dough under damp cloth.
To boil: Bring a large pot of water to a boil and add dumplings to pot. Boil the dumplings until they float.
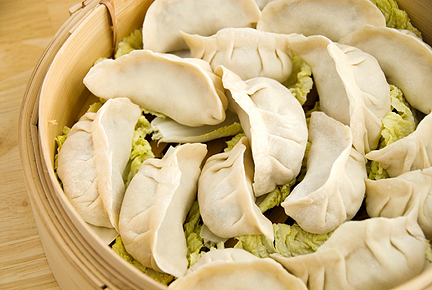
To steam: Place dumplings on a single layer of napa cabbage leaves or on a well-greased surface in a steamer basket with lid. Steam covered for about 6 minutes.
placing the dumplings in a steamer over napa cabbage leaves
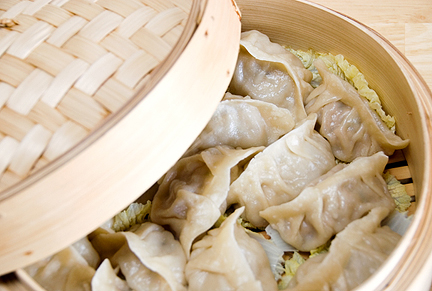
steamed and ready to eat
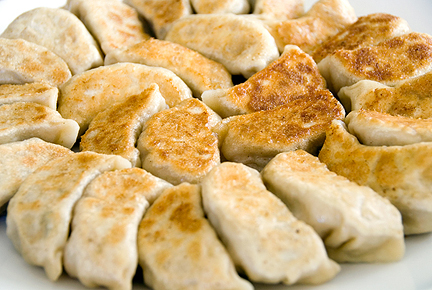
To pan fry (potstickers): Place dumplings in a frying pan with 2-3 tbsp of vegetable oil. Heat on high and fry for a few minutes until bottoms are golden. Add 1/2 cup water and cover. Cook until the water has boiled away and then uncover and reduce heat to medium or medium low. Let the dumplings cook for another 2 minutes then remove from heat and serve.
potstickers, bottoms up to show off the crunchies
To freeze: Assemble dumplings on a baking sheet so they are not touching. It helps to rub the base of the dumpling in a little flour before setting on the baking sheet for ease of release. Freeze for 20-30 minutes until dumplings are no longer soft. Place in ziploc bag and freeze for up to a couple of months. Prepare per the above instructions, but allow extra time to ensure the filling is thoroughly cooked.
To serve: Serve dumplings or potstickers hot with your choice of dipping sauce combinations.
Yum, we need to make these again soon. Homemade are always good. For dipping sauce we usually use soy sauce and rice vinegar. I've found the soy sauce just by itself is too salty, the vinegar mellows it out. I like to add a dollop of something called Wakarashi(Japanese mustard), it tastes yummy, but is probably only available at a specialty store. 007 likes it with hot oil instead. Either way, GREAT work!
ReplyDeleteWhat a lovely job you've done. Your dumplings and pictures of them are beautiful.
ReplyDeleteyummae! What fun! I am soooo glad you joined this group ... everything you have done has looked wonderful and makes me eager to try. I think your brother and sister-in-law would enjoy learning this, too. Sounds like a group project, eh?
ReplyDeleteGreat job! I would have never thought to use cheese in the dumplings - looks yummy!
ReplyDelete