Saturday, June 27, 2009

Daring Baker: Bakewell Tart (or Pudding)

The June Daring Bakers' challenge was hosted by Jasmine of Confessions of a Cardamom Addict and Annemarie of Ambrosia and Nectar. They chose a Traditional (UK) Bakewell Tart... er... pudding that was inspired by a rich baking history dating back to the 1800's in England.

I thought this was pleasing challenge. Not too complicated, but I thought it was tasty. Hubbs, on the other hand, did not.

I decided to make some Lemon Curd to fill my tart. While cooking the Lemon Curd I imagined the conversation I would have with Hubbs about the taste of the finished Tart.

Luna: What do you think?
Hubbs: It is a bit Tart.
Luna: It is supposed to be, it is a tart!

The actual conversation was nothing like that. I served the tart to a few ladies I had over at my house. Later after they left I offered a piece to Hubbs.

Luna: Would you like to try a piece?
Hubbs: ummmm...well....uhhh. I think I need to know more about it.
Luna: It has sugar, almond, egg, lemon, butter, flour. You like all those ingredients.
Hubbs: Um...uh...I guess.
*30 min later and only one bite missing*
Luna: Do you not like it?
Hubbs: (not wanting to say no and hurt my feelings he take another pathetically tiny bite) I think I don't like the texture.
Luna: which layer?
Hubbs: There are layers?
Luna: (sneering) yes!
Hubbs: I just don't think I have had much of this sort of cake.
Luna: (still sneering) it's a TART!

Needless to say, Hubbs did not like it. But I think it might have been the Lemon Curd, not sure! He doesn't like sour or tart things. I, however, LOVE it. And since I was making it, and it is summer time, and I happen to have a few lemons I thought a nice fresh lemon curd would be great!

The Curd turned out great. It was a bit thin, but the kitchen was getting WAY too hot and it was WAY too hot outside, so I stoped at a "good enough" thickness.


The pastry crust was a different story. It all looked good until i tried to pick it up to place it in the dish. It completely fell apart. So I just ended-up piecing it together in the dish and molding it to the dish. (oh well!)

The frangipane seemed to go well. I have never made one before, so what do I know. Maybe it was all wrong too.


I guess it doesn't much matter because everyone, except for Hubbs, seemed to like it. It did get a bit too brown for my liking in the oven around the edge, mainly the crust. So I trimmed that up a bit.

Before trimming


After trimming


Ta-da!


History Lesson we receive on the Bakewell Tart/Pudding issue

Bakewell Tart History and Lore

Flan-like desserts that combine either sweet egg custard over candied fruit or feature spiced ground almonds in a pastry shell have Mediaeval roots. The term “Bakewell pudding” was first penned in 1826 by Meg Dods; 20 years later Eliza Acton published a recipe that featured a baked rich egg custard overtop 2cm of jam and noted,

“This pudding is famous not only in Derbyshire, but in several of our northern counties where it is usually served on all holiday occasions.”

By the latter half of the 1800s, the egg custard evolved into a frangipane-like filling; since then the quantity of jam decreased while the almond filling increased.

This tart, like many of the world's great foods has its own mythic beginnings…or several mythic beginnings. Legend has it in 1820 (or was it in the 1860s?) Mrs. Greaves, landlady of The White Horse Inn in Bakewell, Derbyshire (England), asked her cook to produce a pudding for her guests. Either her instructions could have been clearer or he should have paid better attention to what she said because what he made was not what she asked for. The cook spread the jam on top of the frangipane mixture rather than the other way around. Or maybe instead of a sweet rich shortcrust pastry case to hold the jam for a strawberry tart, he made a regular pastry and mixed the eggs and sugar separately and poured that over the jam—it depends upon which legend you follow.

Regardless of what the venerable Mrs. Greaves’ cook did or didn’t do, lore has it that her guests loved it and an ensuing pastry-clad industry was born. The town of Bakewell has since played host to many a sweet tooth in hopes of tasting the tart in its natural setting.

Bakewell tarts are a classic English dessert, abounding in supermarket baking sections and in ready-made, mass-produced forms, some sporting a thick sugary icing and glazed cherry on top for decorative effect.

Enjoy it with a cup of tea or coffee or just eat it sneaky slice by sneaky slice until, to your chagrin, you realise the whole tart has somehow disappeared despite you never having pulled out a plate, fork or napkin with which to eat it.

Is it a tart or is it a pudding?

Someone once said something like “The Bakewell pudding is a dessert. The Bakewell tart is that girl over there.”

It’s a debate that rages on and we aren’t taking sides on this one. But we will say that many people call this pudding a tart.

While we’re at it...
The etymology of pudding is a rather interesting and slightly convoluted one.* The naming confusion may come from the British manner of referring to the dessert course as ‘pudding’ (as well as referring to fat babies by the same name, though we don’t think that is what was the inspiration in this case). And so any dessert is a pudding until another name comes along and adds clarity to what it really is.

The Lemon Curd recipe I used I git off JoyofBaking.com

3 Large Eggs
1/3 Cup fresh lemon juice (about 2-3 lemons, don't use bottled juice)
1 tablespoon fine lemon zest
3/4 cup granulated sugar
4 tablespoons unsalted butter at room temp. (cut into small pieces is helpful)

In a stainless steel bowl placed over a saucepan of simmering water, whisk together the eggs, sugar, and lemon juice until blended. Cook, stirring constantly (to prevent it from curdling), until the mixture becomes thick (like sour cream or a hollandaise sauce) (160 degrees F or 71 degrees C). This will take approximately 10 minutes. Remove from heat and immediately pour through a fine strainer to remove any lumps. Cut the butter into small pieces and whisk into the mixture until the butter has melted. Add the lemon zest and let cool. The lemon curd will continue to thicken as it cools. Cover immediately (so a skin doesn't form) and refrigerate for up to a week.

Makes 1 1/2 cups (360 ml).

If you want a lighter lemon curd whip 1/2 cup (120 ml) of heavy whipping cream and fold into the lemon curd.


The recipe as I received it.

Makes one 23cm (9” tart)
Prep time: less than 10 minutes (plus time for the individual elements)
Resting time: 15 minutes
Baking time: 30 minutes
Equipment needed: 23cm (9”) tart pan or pie tin (preferably with ridged edges), rolling pin

One quantity sweet shortcrust pastry (recipe follows)
Bench flour
250ml (1cup (8 US fl. oz)) jam or curd, warmed for spreadability
One quantity frangipane (recipe follows)
One handful blanched, flaked almonds

Assembling the tart
Place the chilled dough disc on a lightly floured surface. If it's overly cold, you will need to let it become acclimatised for about 15 minutes before you roll it out. Flour the rolling pin and roll the pastry to 5mm (1/4”) thickness, by rolling in one direction only (start from the centre and roll away from you), and turning the disc a quarter turn after each roll. When the pastry is to the desired size and thickness, transfer it to the tart pan, press in and trim the excess dough. Patch any holes, fissures or tears with trimmed bits. Chill in the freezer for 15 minutes.

Preheat oven to 200C/400F.

Remove shell from freezer, spread as even a layer as you can of jam onto the pastry base. Top with frangipane, spreading to cover the entire surface of the tart. Smooth the top and pop into the oven for 30 minutes. Five minutes before the tart is done, the top will be poofy and brownish. Remove from oven and strew flaked almonds on top and return to the heat for the last five minutes of baking.

The finished tart will have a golden crust and the frangipane will be tanned, poofy and a bit spongy-looking. Remove from the oven and cool on the counter. Serve warm, with crème fraîche, whipped cream or custard sauce if you wish.

When you slice into the tart, the almond paste will be firm, but slightly squidgy and the crust should be crisp but not tough.

Jasmine’s notes:
• If you cannot have nuts, you can try substituting Victoria sponge for the frangipane. It's a pretty popular popular cake, so you shouldn't have any troubles finding one in one of your cookbooks or through a Google search. That said, our dear Natalie at Gluten a Go Go has sourced some recipes and linked to them in the related alt.db thread.
• You can use whichever jam you wish, but if you choose something with a lot of seeds, such as raspberry or blackberry, you should sieve them out.
• The jam quantity can be anywhere from 60ml (1/4 cup) to 250ml (1cup), depending upon how “damp” and strongly flavoured your preserves are. I made it with the lesser quantity of home made strawberry jam, while Annemarie made it with the greater quantity of cherry jam; we both had fabulous results. If in doubt, just split the difference and spread 150ml (2/3cup) on the crust.
Annemarie’s notes:
• The excess shortcrust can be rolled out and cut into cookie-shapes (heck, it’s pretty darned close to a shortbread dough).

Sweet shortcrust pastry

Prep time: 15-20 minutes
Resting time: 30 minutes (minimum)
Equipment needed: bowls, box grater, cling film

225g (8oz) all purpose flour
30g (1oz) sugar
2.5ml (½ tsp) salt
110g (4oz) unsalted butter, cold (frozen is better)
2 (2) egg yolks
2.5ml (½ tsp) almond extract (optional)
15-30ml (1-2 Tbsp) cold water

Sift together flour, sugar and salt. Grate butter into the flour mixture, using the large hole-side of a box grater. Using your finger tips only, and working very quickly, rub the fat into the flour until the mixture resembles bread crumbs. Set aside.

Lightly beat the egg yolks with the almond extract (if using) and quickly mix into the flour mixture. Keep mixing while dribbling in the water, only adding enough to form a cohesive and slightly sticky dough.

Form the dough into a disc, wrap in cling and refrigerate for at least 30 minutes

Jasmine’s notes:
• I make this using vanilla salt and vanilla sugar.
• If you wish, you can substitute the seeds of one vanilla bean, one teaspoon of vanilla paste or one teaspoon of vanilla extract for the almond extract

Frangipane

Prep time: 10-15 minutes
Equipment needed: bowls, hand mixer, rubber spatula

125g (4.5oz) unsalted butter, softened
125g (4.5oz) icing sugar
3 (3) eggs
2.5ml (½ tsp) almond extract
125g (4.5oz) ground almonds
30g (1oz) all purpose flour

Cream butter and sugar together for about a minute or until the mixture is primrose in colour and very fluffy. Scrape down the side of the bowl and add the eggs, one at a time, beating well after each addition. The batter may appear to curdle. In the words of Douglas Adams: Don’t panic. Really. It’ll be fine. After all three are in, pour in the almond extract and mix for about another 30 seconds and scrape down the sides again. With the beaters on, spoon in the ground nuts and the flour. Mix well. The mixture will be soft, keep its slightly curdled look (mostly from the almonds) and retain its pallid yellow colour.

Annemarie’s notes:
• Add another five minutes or more if you're grinding your own almonds or if you're mixing by hand (Heaven help you).

Monday, June 15, 2009

How to prune a tree in the South!

1. Wait for severe weather
2. Hide in a safe place
3. clean yard of all debris

This truly works. Now, be aware that the "gardner" isn't very precise, or tidy, of kind, or convenient, or an actual gardner! However, Many trees and branches will be removed from their former location.

On Friday I was playing a game on the computer with SweetPea when I heard the city sirens screech, and no, I don't me some slutty girls singing to entice us all to danger, though, there was danger of another kind. I quickly got up and explained to SweetPea we could no longer play the game and she was to get her socks and shoes on. (to tell you the truth, we all had to get out of our PJs) So I got clothes out for everyone and we quickly got dressed and ready. I gathered the all weather radio, some snacks, water and books. I woke Eli up and we went and hid in the bathroom. Just as I was walking into the bathroom the power went out. So I told the kids to stay there and I went to get flash light, candles and matches. When i returned to the bathroom I realize Banana seriously needed a diaper change. I attempted to change it with the diapers I brought into the bathroom, but I didn't have wet wipes and the TP wasn't cutting it. So I went back out to grab the wet wipes and hand sanitizer. I also thought I should check how bad it was outside and see if I needed to take down wind chimes and hanging plants. As soon as I opened the storm door, I quickly went back inside. It was eerily calm, too calm. (I've seen the movies, that is never a good sign)

We spent awhile in the bathroom singing songs reading books and listening to the radio. The kids didn't enjoy the radio part. We were able to talk to Hubbs a few times. He was safe and sound.

After the warning passed we left the bathroom, but we waited awhile before we ventured outside. We did finally go outside to see all the work the "gardner" had done. It took us a couple of days to collect all the branches and haul them to the curb.

We spent Friday evening checking in on our neighbors. We all lost electricity and the poser company was saying it would be a couple of days before we got it back. Friday night stayed cool, but Saturday was ugly.

As for our fridge and freezer, Friday night we bought up a bunch of ice and packed the top shelves with ice. Then on Saturday our Home Teacher let use his generator. Thank you!

We had to come up with fun things to do without electricity. We also had to figure out how to see in the dark more efficiently, how to keep cool, how to warm bottles for Banana, and how to clean sippy cups and bottles.

As for bottle warming we found placing a bottle of water in the hot car for a bit warmed the water to make a bottle. We ended-up buying a small camping stove. We could then warm water for bathing the kids, and washing dishes. We also used it to warm bottles as well.

On Saturday we were able to watch the dump trucks come around and collect all the branches and trees the gardner pruned. It was amazing to watch the operator move the massive claw around to pick-up everything. It was impressive how exact he was. The next door neighbors tree was hit by lightening again. (3rd time in less than a year) I just hope the tree stays standing because if it falls, our tree will be the new lightening rod. I could not believe the number of tree that were lost during the storm. It was hard to get in and out of our neighborhood. It was worse at night because we had to street lights, or any lights at all, for that matter, other than the head lights. I never really realized before how much ambient light I use to drive at night. Saturday night we VERY muggy. I filled some spray bottles with water and misted myself throughout the night. Banana was miserable. She wasn't eating well and she developed a nasty cough. So Hubbs to her and slept with her in the van. He turned it on and let the a/c run. It wasn't as comfortable cushion wise, but much more comfortable temperature wise.

We dined out a lot. Chick-fil-A is great. It was cool and the kids could run around.

We did finally get power back on Sunday afternoon. It is so nice to have electricity! Next time I think I will hire an arborist!

Sunday, June 14, 2009

Daring Cook: Potstickers

Chinese dumplings/potstickers (aka gyoza in Japanese) Thank you Jen from use real butter for hosting the Daring Cooks June 2009 challenge.
I have wanted to learn how to make potstickers for such a LONG time. I was so excited by this challenge. Thank you, thank you, thank you!

I have to say, my finished product was not very pretty, but they tasted good, AND I had fun. It took a long time to get them all done.

I started by making the wrapper dough. AS it was resting I began to make the filling. I used a little bit of this and a little bit of that. Basically I just opened the fridge, freezer, and pantry and found what I could use up.

I used some ground pork, carrots, spinach, garlic, egg, soy sauce, sesame oil, cornstarch. Maybe some other things too. I did it in a frenzy, so I don't much remember what I was throwing in there. From the picture it looks like I also added some teriyaki sauce, chardonnay salt, cilantro bullion and onion bullion. I then began to roll out the wrappers. Then used a Tablespoon to scoop the filling into the wrapper.
I began to fold them. It took a bit to get the hang of it. It took awhile to get the wrappers thin enough. I played with a couple of different ways to fold them up. Some worked better than others.
I froze these dumplings to use at a later time. Here they are after freezing individually, but before I bagged them.
A few days later I did finally cook some up for dinner. I made a simple dipping sauce with soy sauce, sesame oil.
I thought they turned out a bit salty, Hubbs thought the dipping sauce was salty. Regardless, they were pretty good.

After I had used-up all the pork filling I still had a good amount of wrapper dough left. So I decided to try something fun. I thought about a dessert filling, but honestly at that moment I was hungry and wanted something savory.

I took some cottage cheese and drained it a bit. Added cilantro and a little cornmeal. (the cornmeal was to thicken it up a bit.)
I made the dumplings, pan fried them and served them with som avacado and lemon. They were SOOOOOOOO good. I think the best thing I have eaten in a long time. Granted, I may have been really hungry, but I think they were just really good.


The Recipe as I received it.

It's a basic concept: a filling inside a dough wrapper, sealed, and cooked. This delicious theme runs through many cultures and is among the more popular bites at Chinese restaurants - especially dim sum. The recipe I provide is based on my family recipe. There is a lot of wiggle room and I encourage you to explore. If you've made them before - great! Now try something different!

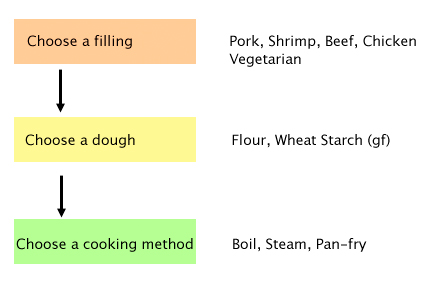
The process goes a little like this:

You can (and should) reference instructional photos and discussion on my blog post here.

Wrappers: Well yes, you could purchase pre-made dumpling wrappers at the store (NO WONTON WRAPPERS - they have egg), but they are inferior compared to homemade. The whole point of this challenge is to make the dumpling wrappers by hand. So here is the one requirement: the dumpling wrappers must be made by hand. It isn't all that hard, it just takes a little time and practice. People usually get the hang of it after making about a dozen. **NOTE: I have a special recipe for gluten-free dumpling wrappers at the bottom of the post. They are another type of traditional dumpling and they are pretty awesome (although more finicky). Really delicious too, so you may want to have a looksee even if you aren't gluten-free. [EDIT 5/18/09:] I see that some have chosen to make the wrappers by hand. I don't recommend this method because the wrappers will be too thick and probably yield far fewer dumplings for the dough recipe. The point of rolling the dough is for uniformity of wrapper and to achieve a thickness that is otherwise difficult to attain by hand. Also, rolling is much faster than hand shaping. We're aiming for a delicate skin that does not dominate the dumpling.

Fillings: the beauty of the Chinese dumpling/potsticker is that the filling is very versatile. That's why there are so many different kinds of dumplings when you go to dim sum. The two most common are pork and shrimp. You can make them with other ground meats (beef, chicken...) or vegetarian (tofu, mushrooms, bamboo shoots, water chestnuts, glass noodles, Chinese chives - oh yum!). The important thing to keep in mind is that the filling needs to "stick" to itself or else you will make your life incredibly miserable wrapping up filling that keeps falling apart. I think if I were to make vegetarian dumplings, I would sauté the cabbage and mash up the tofu for a better cohesiveness. It's up to you how you want to fill your dumplings and I say - run with it! Just keep it cohesive and no big chunks of hard ingredients (they poke through the wrapper dough = disaster). I realize it may be tempting to dump all of the vegetables into a food processor and give it a whir, but I caution against it. You don't want a slurry, you want a mince. Practice your knife skills and be careful.

Special Equipment: A rolling pin - preferably not tapered. (see blog pictures for the type I use).

Time: Prep for the filling takes me 30 minutes - longer if peeling and de-veining shrimp. It will depend on your proficiency with a good sharp knife. Rolling and wrapping several dozen dumplings takes me 1 hour by myself. My parents can crank through it in 30 minutes when one person is rolling wrappers and the other is wrapping dumplings. Might be fun to get a second person to help! Cooking: I have to cook mine in batches. When steaming, I can cook a dozen at a time in about 10 minutes. Potstickers: 15 minutes per 2 dozen determined by the size of your pan. Boiling - 6 minutes per dozen or so depending on size of pot. My own personal preference is for potstickers - mmmmm! But they are ALL good. Here is the recipe:

Chinese Dumplings/Potstickers

pork filling:
1 lb (450g) ground pork
4 large napa cabbage leaves, minced
3 stalks green onions, minced
7 shitake mushrooms, minced (if dried - rehydrated and rinsed carefully)
1/2 cup (75g) bamboo shoots, minced
1/4 (55g) cup ginger root, minced
3 tbsp (40g) soy sauce
2 tbsp (28g) sesame oil
2 tbsp (16g) corn starch

OR

shrimp filling:
1/2 lb (225g) raw shrimp, peeled, deveined, and coarsely chopped
1/2 lb (225g) ground pork
3 stalks green onions, minced
1/4 cup (55g) ginger root, minced
1 cup (142g) water chestnuts, minced
1 tsp (5g) salt
3 tbsp (40g) sesame oil
2 tbsp (16g) corn starch

dough: (double this for the amount of filling, but easier to make it in 2 batches - or just halve the filling recipe)
2 cups (250g) all-purpose flour
1/2 cup (113g) warm water
flour for worksurface

dipping sauce:
2 parts soy sauce
1 part vinegar (red wine or black)
a few drops of sesame oil
chili garlic paste (optional)
minced ginger (optional)
minced garlic (optional)
minced green onion (optional)
sugar (optional)

Combine all filling ingredients in a large mixing bowl and mix thoroughly (I mix by clean hand). Cover and refrigerate until ready to use (up to a day, but preferably within an hour or two).

Make the dough, Method 1: Place the flour in the work bowl of a food processor with the dough blade. Run the processor and pour the warm water in until incorporated. Pour the contents into a sturdy bowl or onto a work surface and knead until uniform and smooth. The dough should be firm and silky to the touch and not sticky.[Note: it’s better to have a moist dough and have to incorporate more flour than to have a dry and pilling dough and have to incorporate more water).

Make the dough, Method 2 (my mom’s instructions): In a large bowl mix flour with 1/4 cup of water and stir until water is absorbed. Continue adding water one teaspoon at a time and mixing thoroughly until dough pulls away from sides of bowl. We want a firm dough that is barely sticky to the touch.

[EDIT: 5/26/09] There have been two complaints posted about a dry dough and I realize that this rests in the problem of measuring flour which has a different density and hence weight for 2 cups depending on how you scoop it. That is why I also list the weight: 250g. Flour tends to settle over time, so when I scoop it out, I shake several cups' worth back into the container before taking a final scoop of soft, fluffy, flour and I get 250g for 2 cups. When you knead the dough, if it feels hard and dry, then you can add more water. [Warning: it will NOT be a soft bread dough, so don't expect it to be, but it shouldn't be a brick either.] It is perfectly fine to use more than the 1/2 cup listed in the recipe as everyone's climate and flours vary. Use your judgment - this is what being a Daring Cook is about. We are trying to cultivate a sense of intuition so that recipes are general guidelines from which you can expand your own style.

Both dough methods: Knead the dough about twenty strokes then cover with a damp towel for 15 minutes. Take the dough and form a flattened dome. Cut into strips about 1 1/2 to 2 inches wide. Shape the strips into rounded long cylinders. On a floured surface, cut the strips into 3/4 inch pieces. Press palm down on each piece to form a flat circle (you can shape the corners in with your fingers). With a rolling pin, roll out a circular wrapper from each flat disc. Take care not to roll out too thin or the dumplings will break during cooking - about 1/16th inch. Leave the centers slightly thicker than the edges. Place a tablespoon of filling in the center of each wrapper and fold the dough in half, pleating the edges along one side (see images in post for how to fold pleats). Keep all unused dough under damp cloth.

To boil: Bring a large pot of water to a boil and add dumplings to pot. Boil the dumplings until they float.

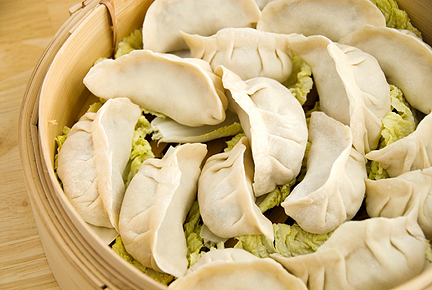
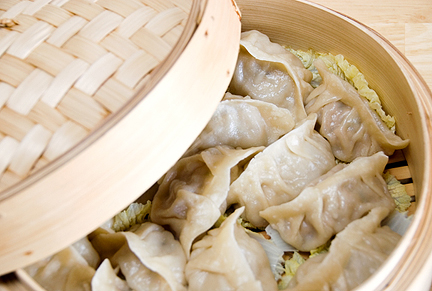
To steam: Place dumplings on a single layer of napa cabbage leaves or on a well-greased surface in a steamer basket with lid. Steam covered for about 6 minutes.

placing the dumplings in a steamer over napa cabbage leaves

steamed and ready to eat

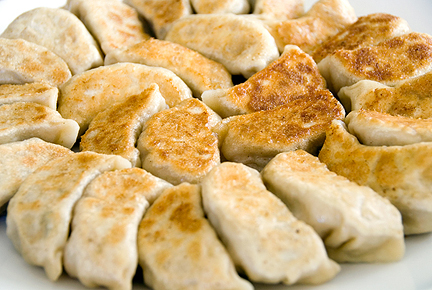
To pan fry (potstickers): Place dumplings in a frying pan with 2-3 tbsp of vegetable oil. Heat on high and fry for a few minutes until bottoms are golden. Add 1/2 cup water and cover. Cook until the water has boiled away and then uncover and reduce heat to medium or medium low. Let the dumplings cook for another 2 minutes then remove from heat and serve.

potstickers, bottoms up to show off the crunchies

To freeze: Assemble dumplings on a baking sheet so they are not touching. It helps to rub the base of the dumpling in a little flour before setting on the baking sheet for ease of release. Freeze for 20-30 minutes until dumplings are no longer soft. Place in ziploc bag and freeze for up to a couple of months. Prepare per the above instructions, but allow extra time to ensure the filling is thoroughly cooked.

To serve: Serve dumplings or potstickers hot with your choice of dipping sauce combinations.

Thursday, June 4, 2009

TRAPPED!

I have some VERY funny friends. They have a way of making me laugh so much. Honestly, probably too much. So much so I have been known to wet my pants. I am not afraid to admit that people! I can't control it, it just happens, ok! And before you start telling me to get the kegels going, I know! It helps, but it isn't perfect. I think the problem is I laugh too hard. I LOVE to laugh. It feels so great. I don't care if I laugh loud or I laugh dorky! I LOVE TO LAUGH.

But honestly, that really has nothing to do with the actual point of this post. The point starts with one of my friends. He is so funny. I remember a time when we went out for Chinese food and we finished our meal and we were all opening our fortune cookies. We went around the table reading our fortunes, and when it got to his turn he said (in an increasingly perplexed voice) "Help! Help! I am trapped in a fortune cookie sweat shop!" I laughed so hard! Too funny!

Anyway. Sometimes I feel like I am trapped in a fortune cookie sweat shop. Other than the whole fortune cookie thing. And I guess I don't really live in a sweat shop either. Maybe I feel more like I am trapped in a fortune cookie itself! Like I can't get out but I can see everyone else outside my sealed cellophane wrapper.

For the last half a year we have been battling so many illnesses. I have stuck thermometers in more rectums in the last few months than I care to count. I have used multiple bottles of various disinfectants. I think pediatricians office is going to put me on the payroll soon, cuz it feels like I am there enough to earn a pay check. To add to it, Hubbs needs time to study. I hear about all these neat things people are doing and fun places to go, and I just can't seems to get out of the cellophane.

I am determined to make this the last week of fevers, vomiting, diarrhea, asthma, back pain, post-nasal drip, chills, ear infection, or any other malady that could befall our home. I don't want to go to another lab or walk-in clinic. I don't want to call any on-call doctors. I don't want to go to anymore hospitals. I don't want to wait for anyone to call me back with results. I don't want to go to the pharmacy again.

I just want health! I want a pain-free symptom-free life. I want to go somewhere that doesn't require (or at least prefer) an appointment. I want to use all the membership cards I have in my wallet. I want to feel safe to visit with other people again.

I just want my life off of hold. I want to rip through the cellophane!

Monday, June 1, 2009

Steve!

Bubba has always been a great sleeper. It has been such a blessing in so many ways. Though it does come at a price at times. He can be a bit ridged with aspects of it. For example.... he wants to just lie down, no holding, no fuss, no muss. Some of you might say "that sounds wonderful." and you would be right, most of the time. But let's say you are at church and there is NO place to "just lie down" AND he gets super cranky when he doesn't get his sleep. So it can be problematic.

For awhile he had to have his blanket, aptly named "red" for its red color. He would drag "Red" around with him everywhere like Linus. He really had to have it after he had tubes put in his ears. I think it was traumatic for him.

Anyway, recently he has eased-up on Red. But he picked up a new item. Steve!

let me give you a bit of history on Steve. Steve is a camel. I know, not the name you would think of for a camel, but that is what Bubba picked. Steve is actually my camel. It was given to me by my father as a Christmas gift (I believe in 2001.) He is about 18" tall and is more of a large figurine than a toddler toy. He is not plush or soft in any manner. He is cover in leather with black glass eyes. I am not sure why my father felt I needed an 18" camel, maybe he intended for me to start a nativity scence, but that is hard to imagine. There are only two reason my father gave me the camel. 1.) he wanted to see my reaction to such an unusual gift. This is quite often the reasoning behind many gifts in my family. It isn't unheard of for my family to buy the most bizarre and useless (at least to the person receiveing it) gift we can find. For the most part, we have all our needs met, so it is just frivolous, albeit neat/great/fun/welcomed stuff at times. As an example, I think the year before (2000) he gave me a HUGE cooking pot. I am talking HUGE, like something you cook a medium sized animal in, OUTSIDE! Or you could bathe a small child in it. Notice the trike next to it so you can have a size comparison.

2.) He remembered a conversation I had about future interior decoarting I envisioned for my future house. The funny part about that is, It isn't anything I plan on doing anymore. Needs and desires change as you grow-up and have kids.

Regardless of the reasoning, I now have this camel. I have been trying to figure out what to do with it ever since I received it. I have tried to donated it on several occasions, but Hubbs always stops me, for what reason, I am not sure. Well, the last time I had it in the donation pile bubba found it and decided it was a great toy. He pretended to ride it all around the house. He would sit on it and scoot it everywhere. I tried to get a picture, but he was just too fast for it to turn out.

He will take the camel with him all over the house.


He even decied it is his new bed buddy. Remember, it is not a soft toy.


I decided to ask Bubba what his camel's name was. He said "Steve!"

So I guess Steve is a part of my life now. Thanks Dad!

Thursday, May 28, 2009

Thousand Word Thursday


This picture is from 2004. Chris and I hosted a Root Beer tasting. It was lots' of fun. I think we bought WAY too many Root Beers to try, but it was so much fun. It was really amazing to taste how different each Root Beer actually tasted. By the end I think we all had drank way more than we had wanted.

Wednesday, May 27, 2009

Daring Baker: Strudel

The May Daring Bakers’ challenge was hosted by Linda of make life sweeter! and Courtney of Coco Cooks. They chose Apple Strudel from the recipe book Kaffeehaus: Exquisite Desserts from the Classic Cafés of Vienna, Budapest and Prague by Rick Rodgers.

So the challenge was strudel. I thought it was lots of fun. I have never made strudel before and it seemed like a nice chance to get my hands into some dough.

I started out making the strudel for a dinner party we were attending, but things got a bit waylaid. I made the dough but things didn’t work out to make the filling, and after the dough had been in the fridge for a week it was VERY elastic. So I tossed it. There was just absolutely no way I could have gotten it to actually stretch. It just snapped back.

The next batch of dough I made was perfect. It stretched so easily. I got some tiny tears, but mainly because I got impatient because my back began to hurt, not form the actual making of the dough, but because I injured it last week.

The first one I filled with a great nut mixture.
  • 1/2 cup evaporated milk
  • 2 cups chopped nuts (I used hazelnuts, macadamia nuts, pecans, and almonds)
  • 1/2 cup white sugar
  • 2 tablespoons honey
  • 1 teaspoon cinnamon
  • 1/8 teaspoon salt
  • 2 tablespoons butter
  • 1/2 teaspoon vanilla extract
The actual pictures of the mixture by itself looked completely unappealing (actually quite disgusting, I thought it looked pretty gross as I was making it.)
Here it is after baking.

The picture of the finished product looks like meat!

The second one I filled with a citrus and cheese mixture.

  • 1 to 1-1/2 lb. dry cottage cheese
  • 2 whole eggs
  • 3/4 cup powdered sugar
  • 3 tbsp. sour cream
  • juice of a lime
  • Zest of a couple lemons and limes
I didn’t get the cottage cheese dry enough so it was a bit wet and so it ended-up busting through the dough. But it still tasted great.

I thought it would be fun to garnish with some candied citrus. So I learned how to do that as well.
  • 2-3 limes
  • 1 cup sugar
  • 1 cup water
  • A little more sugar for coating
1. Slice limes into thin rounds, blanch in a pot of boiling water for 2 min & drain.
2. In the same pot, combine water & 1 cup sugar. Bring to a simmer & add lime slices. Simmer for 10-15 min, till white pith of limes looks translucent (May take longer if pith is especially thick or dense).
3. Drain & spread out on a cooling rack to dry for at least 1 hour.
4. Put 2 tbsp sugar in shallow bowl or saucer. When limes are dry, coat both sides of the lime slices by pressing them into the sugar (May need more sugar for good coverage).
5. Store in an airtight container & layer between parchment paper or plastic wrap till ready to use. You can freeze & then just take out what you need to use.


Here is the recipe as I received it.

(Please also read the tips and notes on the trial runs Courtney and Linda did. You'll find them below the recipes.)

Preparation time
Total: 2 hours 15 minutes – 3 hours 30 minutes
15-20 min to make dough
30-90 min to let dough rest/to prepare the filling
20-30 min to roll out and stretch dough
10 min to fill and roll dough
30 min to bake
30 min to cool

Apple strudel
from “Kaffeehaus – Exquisite Desserts from the Classic Cafés of Vienna, Budapest and Prague” by Rick Rodgers

  • 2 tablespoons (30 ml) golden rum
  • 3 tablespoons (45 ml) raisins
  • 1/4 teaspoon ground cinnamon
  • 1/3 cup plus 1 tablespoon (80 g) sugar
  • 1/2 cup (1 stick / 115 g) unsalted butter, melted, divided
  • 1 1/2 cups (350 ml) fresh bread crumbs
  • strudel dough (recipe below)
  • 1/2 cup (120 ml, about 60 g) coarsely chopped walnuts
  • 2 pounds (900 g) tart cooking apples, peeled, cored and cut into ¼ inch-thick slices (use apples that hold their shape during baking)
1. Mix the rum and raisins in a bowl. Mix the cinnamon and sugar in another bowl.
2. Heat 3 tablespoons of the butter in a large skillet over medium-high. Add the breadcrumbs and cook whilst stirring until golden and toasted. This will take about 3 minutes. Let it cool completely.
3. Put the rack in the upper third of the oven and preheat the oven to 400°F (200°C). Line a large baking sheet with baking paper (parchment paper). Make the strudel dough as described below. Spread about 3 tablespoons of the remaining melted butter over the dough using your hands (a bristle brush could tear the dough, you could use a special feather pastry brush instead of your hands). Sprinkle the buttered dough with the bread crumbs. Spread the walnuts about 3 inches (8 cm) from the short edge of the dough in a 6-inch-(15cm)-wide strip. Mix the apples with the raisins (including the rum), and the cinnamon sugar. Spread the mixture over the walnuts.
4. Fold the short end of the dough onto the filling. Lift the tablecloth at the short end of the dough so that the strudel rolls onto itself. Transfer the strudel to the prepared baking sheet by lifting it. Curve it into a horseshoe to fit. Tuck the ends under the strudel. Brush the top with the remaining melted butter.
5. Bake the strudel for about 30 minutes or until it is deep golden brown. Cool for at least 30 minutes before slicing. Use a serrated knife and serve either warm or at room temperature. It is best on the day it is baked.

Strudel dough
from “Kaffeehaus – Exquisite Desserts from the Classic Cafés of Vienna, Budapest and Prague” by Rick Rodgers

  • 1 1/3 cups (200 g) unbleached flour
  • 1/8 teaspoon salt
  • 7 tablespoons (105 ml) water, plus more if needed
  • 2 tablespoons (30 ml) vegetable oil, plus additional for coating the dough
  • 1/2 teaspoon cider vinegar
1. Combine the flour and salt in a stand-mixer fitted with the paddle attachment. Mix the water, oil and vinegar in a measuring cup. Add the water/oil mixture to the flour with the mixer on low speed. You will get a soft dough. Make sure it is not too dry, add a little more water if necessary.
Take the dough out of the mixer. Change to the dough hook. Put the dough ball back in the mixer. Let the dough knead on medium until you get a soft dough ball with a somewhat rough surface.
2. Take the dough out of the mixer and continue kneading by hand on an unfloured work surface. Knead for about 2 minutes. Pick up the dough and throw it down hard onto your working surface occasionally.
Shape the dough into a ball and transfer it to a plate. Oil the top of the dough ball lightly. Cover the ball tightly with plastic wrap. Allow to stand for 30-90 minutes (longer is better).
3. It would be best if you have a work area that you can walk around on all sides like a 36 inch (90 cm) round table or a work surface of 23 x 38 inches (60 x 100 cm). Cover your working area with table cloth, dust it with flour and rub it into the fabric. Put your dough ball in the middle and roll it out as much as you can.
Pick the dough up by holding it by an edge. This way the weight of the dough and gravity can help stretching it as it hangs. Using the back of your hands to gently stretch and pull the dough. You can use your forearms to support it.
4. The dough will become too large to hold. Put it on your work surface. Leave the thicker edge of the dough to hang over the edge of the table. Place your hands underneath the dough and stretch and pull the dough thinner using the backs of your hands. Stretch and pull the dough until it's about 2 feet (60 cm) wide and 3 feet (90 cm) long, it will be tissue-thin by this time. Cut away the thick dough around the edges with scissors. The dough is now ready to be filled.

Tips
- Ingredients are cheap so we would recommend making a double batch of the dough, that way you can practice the pulling and stretching of the dough with the first batch and if it doesn't come out like it should you can use the second batch to give it another try;
- The tablecloth can be cotton or polyester;
- Before pulling and stretching the dough, remove your jewelry from hands and wrists, and wear short-sleeves;
- To make it easier to pull the dough, you can use your hip to secure the dough against the edge of the table;
- Few small holes in the dough is not a problem as the dough will be rolled, making (most of) the holes invisible.
Both Courtney and I did a trial run on making the strudel. Below are our notes:

Courtney's notes
- She couldn't get it to stretch to 2 feet by 3 feet, it turned out more like 2 feet by 2 feet. But the dough was tissue thin nevertheless;
- She got some serious holes, but after rolling it wasn't noticeable;
- She used a large cheese cloth which helped manipulate and stretch the dough more than a heavier cloth would have.

Linda’s notes
- I made the dough by hand, just mixed the wet ingredients into the dry ingredients with a wooden spoon. Kneaded it for about 5 min like you would bread dough. This worked as well. Haven't tried using a stand mixer so I don't know how it compares.
- Instead of cider vinegar I used red wine vinegar;
- I used bread flour;
- Picking up the dough to let it stretch didn't work well for me, holes appeared pretty much instantly. Instead I stretched the dough while it was lying on the tablecloth by putting my hands underneath and stretching it out further and further;
Here's a link to a strudel making video that might help you a bit.

Sunday, May 24, 2009

So Sick!

Why are we so sick. I just hope the second half of 2009 is healthier than the 1st half. I know the first half isn't over yet, but seriously, we need a game changer!

Just about everyone has had an ear infection. (we finally got tubes in Bubba's ears, he is starting to talk more now.) Everyone had the flu at least once, most of us twice. They thought Bubba had dysentery, I thought it was giardia, but it turns out it was nothing. We finally got the test results, it was all negative. (BTW I HATED getting that sample. Nothing like poring a sample out of a diaper into a cup) Let me remind you of a previous post on the matter. It cleared-up. Either the antibiotics or it just times out on its own.

Now Banana has had a fever for over a week. She acts basically normal. A little fussy, but not bad. But since it had been 7 days we took her in to see the Doc. Her blood counts were crazy out of whack. We put her on antibiotic too. It seems to be a bit better.

Of course all three kids ended-up with eye infections. I don't think it was Pink eye, but it was something. SweetPea looked the word. It looked like she had gone a couple rounds in a boxing ring. The circles under her eyes were SOOOO dark. Her lids were so swollen when she got up in the morning, she could hardly open them. All the kids HATE the drops. It takes 2 of us to pin them down and pry their eyes open. Luckily it is clearing quickly.

But of course the next day (you know, the one where we went and saw the doc) SweetPea began to complain of ear pain. She was whining and writhing on the bed as she tried to sleep. So she went back. Strep! Yuck.

As for me... well, cleaning all the bodily fluids up off the floor and cradling little ones I guess took its toll, because I hurt my back big time. I spent about 5 days in bed, unable to walk. Well, I could walk, but only if I walked bent over like a fallin' "L." So off to the doctor I went. Some prescription pain meds and muscle relaxants and more time in bed finally made it possible for me to raise form the dead. Only to wish i could climb back in. The house was awful. Holy Cow.

Ain't no Sunshine when it rains. And it seems to be rainin hard right now. I mean that both literally and figuratively.

Friday, May 22, 2009

Fashion Icon!

The other day Bubba was running around in his diaper. He came up to me with some socks and shoes and asked me to put them on him. I was amused by the thought of him not only running around in his diaper, socks and shoes, but that the shoes were sandals. To top it off later I found him with a cheek peeking through. I tried desperately to snap a picture, but he would have none of it. I guess this fashion icon has grown tired and annoyed by the paparazzi.

Wednesday, May 20, 2009

Crayon Roll

I first heard of these on a friends blog. She was making them for gifts, and I thought it was a good idea. So I did a little digging and found some directions. The kids like them. They can sort colors and arrange the colors in all sorts of patterns. I highly recommend you keep them and all crayons away form heat sources, like the stove. We had a serious accident with an orange crayon and the kitchen counter this evening. OOPS!

I have seen the directions for Crayon Rolls in 2 places. (Skip to My Lou STML and Chocolate on the Cranium COMC) They are slightly different, but basically the same. I have only tried the STML directions, so I can't much comment on the directions from COMC.

If you want a really simple version check this one out. No turning and far less stitching!

1 - 5 X 16 1/2 inch piece of fabric for the outside
1 - 5 X 16 1/2 inch piece of fabric the the inside
1 - 6 X 16 1/2 inch piece of fabric folded lengthwise and pressed for the pocket
ric rac (if desired)
1 - 5 X 16 1/2 piece of vinyl (to keep the crayopns from marking-up the fabric, if you don't use the vinyl, I recomend ironing some interfacing to the wrong side of the lining)
20-24" piece of ribbon or cord for fastening
16 crayons


I bought the box of 16 crayons which are a bit thicker than the standard crayons. I have heard they are harder to find. I found mine at Wal-Mart. The one problem I found is they were really snug to get in and out of the roll, and they are a bit bulky for rolling. When i look at the pictures on both the blog listed above, they either admit they are the smaller crayons, or they just REALLY look like they are. The COMC directions slots are a bit smaller, so I don't even think the bigger crayons will fit. STML says to use the 16 crayon box, but the pictures look like the thin crayons. Maybe in my area the 16 box is only the thick ones. Who knows. Anyway.

Layer the vinyl on top of the right side of the inside lining, then the pocket piece on top of the vinyl. Measure in 1 1/4 in from the side and stitch from top of pocket to bottom, you will want to back stitch at the top. Then stitch every 1 inch. You should have 1 1/4 inches left on the other end. (I purposefully picked a fabric for the pockets that had 4" wide squares, that way some of the measuring was done for me!)
If using ric rac (I used piping on one that turned out pretty nice, you can see it in the top picture) pin it around the edges, overlap at bottom.
Place outside piece on top of pocket and lining, right sides together. Place the tie (folded in half) in the middle on the right side. Ends of tie go towards the center.


Sew all the way around 1/4 inch from the edge. Leave a 2-3 inch opening somewhere so you can turn it right side out. In the picture below I have the opening at the bottom.


Clip corners and turn.
Press (don’t press vinyl with bare hot iron), making sure to press opening to the inside. Pin opening shut and then top stitch all the way around very close to the edge (making sure you sew all layers of the opening shut.) With the ric rac you may have to rip and re-sew a few areas. As you can see, it isn't perfect in the picture.
All done!


SEW (hahaha) what I would recommend is this... if you are going to use the thicker crayons, I would increase the fabric size slightly and make the slots slightly wider. You can see the thicker crayons pull the fabric forward so the outside fabric doesn't lay flat. Also the crayons seem to stick up farther than the pictures on STML. She also said her crayons have a tendency to slip out with the vinyl, so she uses elastic cord and a cod stop instead of a tie (also great for those little ones that can't tie a bow or knot yet) There is NO WAY the thick crayons could slip out. So she HAS to be using the thinner crayons. I was thinking of trying to add a 1/4" to all the slots to accommodate the thicker crayons. It might need a little "head room" at the top for the crayon. Sheesh, this seems to be getting more complicated. Let me just state that it works PERFECTLY fine the way it is. These are just little thinks I want to try and tweak and fix. I do this to patterns all the time. If you try any of this, let me know if it helps/works. If you are going to use the thinner crayons, you might want to try the COMC directions because the slots are only 3/4" wide.

Please let me know how yours turn out and if you made any adjustments.

Monday, May 18, 2009

This made me Laugh!

I think I have such funny friends! Kelly, did you do this on purpose?

Friday, May 15, 2009

Unbelievable

I saw these amazing cookies and thought some of you might like to take a look!

Thursday, May 14, 2009

Daring Cook: Ricotta Gnocchi

This is the first EVER Daring Cook challenge. I was so glad I was able to join as they started this up.

The challenge this time was to make Ricotta Gnocchi. I have never made gnocchi so I thought it would be fun. In the directions we were told the fresher the ricotta the better, and then they gave us some links that gave directions on how to make ricotta at home. So I began the process. It seemed easy enough. Heat some milk, add lemon juice, drain. I did it. The ricotta looked great.
The next step was to be patient. This is were I had problems. For the gnocchi you need to let the ricotta drain a lot, or it is too wet. The ricotta seemed dry enough to me so I went ahead an made the gnocchi.The "dough" looked good to me. I shaped them. They seemed a bit wet, and I began to get nervous. I had every right to be nervous. Cuz this is what I got.Yummy, huh? Actually it did taste really great as ricotta soup! I added some flour to the rest of the gnocchi mix and they firmed up and I had a couple of those. (I know the recipe said to add egg white, and if I had them, I would have, but I didn't)

The next day I decided to make some more ricotta, again, I thought it looked great. I was good, I waited. I waited 24 hrs. I opened up the cheese cloth and it was all liquid and spilled down the drain. So there is no picture because there WAS no picture.

Frustrated, I decided to turn to a good ol' friend, the Internet. I found this link. I switched to Vinegar instead of Lemon juice. And I got out the thermometer and made sure the temp was high enough. I also tried Fat free milk instead of the whole milk with added cream. It was magic. It was amazing. It drained so fast.
But just to make sure I hung it on the sink for a bit.Then I placed it in the fridge to drain some more. Then the next day I began the gnocchi.
Here they are waiting to be rolled/jiggled.I carefully picked them up
Of course, right as I was about to boil the gnocchi Hubbs called and said he was going to stay at school late and study. So I froze 'em. We had them a week or so later with some Pork Loin and asparagus. It was quite good.


Here is the recipe with the pictures provided with the recipe.

Zuni Ricotta Gnocchi

Source: From The Zuni Café Cookbook.

Yield: Makes 40 to 48 gnocchi (serves 4 to 6)

Prep time: Step 1 will take 24 hours. Steps 2 through 4 will take approximately 1 hour.

Tips:

- If you can find it, use fresh ricotta. As Judy Rodgers advises in her recipe, there is no substitute for fresh ricotta. It may be a bit more expensive, but it's worth it.
- Do not skip the draining step. Even if the fresh ricotta doesn't look very wet, it is. Draining the ricotta will help your gnocchi tremendously.
- When shaping your gnocchi, resist the urge to over handle them. It's okay if they look a bit wrinkled or if they're not perfectly smooth.
- If you're not freezing the gnocchi for later, cook them as soon as you can. If you let them sit around too long they may become a bit sticky.
- For the variations to the challenge recipe, please see the end of the recipe.

Equipment required:

- Sieve
- Cheesecloth or paper towels
- Large mixing bowl
- Rubber spatula
- Tablespoon
- Baking dish or baking sheet
- Wax or parchment paper
- Small pot
- Large skillet
- Large pan or pot (very wide in diameter and at least 2 inches deep)

Videos that might help:

- Judy Rodgers Gnocchi Demo
- Making fresh ricotta demo
- Making ricotta gnocchi

For the gnocchi:

1 pound (454 grams/16 ounces) fresh ricotta (2 cups)
2 large cold eggs, lightly beaten
1 tablespoon (1/2 ounce) unsalted butter
2 or 3 fresh sage leaves, or a few pinches of freshly grated nutmeg, or a few pinches of chopped lemon zest (all optional)
½ ounce Parmigiano-Reggiano, grated (about ¼ cup very lightly packed)
about ¼ teaspoon salt (a little more if using kosher salt)
all-purpose flour for forming the gnocchi

For the gnocchi sauce:

8 tablespoons (227 grams/1/4 pound/4 ounces) butter, sliced
2 teaspoons water

Step 1 (the day before you make the gnocchi): Preparing the ricotta.

If the ricotta is too wet, your gnocchi will not form properly. In her cookbook, Judy Rodgers recommends checking the ricotta’s wetness. To test the ricotta, take a teaspoon or so and place it on a paper towel. If you notice a very large ring of dampness forming around the ricotta after a minute or so, then the ricotta is too wet. To remove some of the moisture, line a sieve with cheesecloth or paper towels and place the ricotta in the sieve. Cover it and let it drain for at least 8 hours and up to 24 hours in the refrigerator. Alternatively, you can wrap the ricotta carefully in cheesecloth (2 layers) and suspend it in your refrigerator for 8 to 24 hours with a bowl underneath to catch the water that’s released. Either way, it’s recommended that you do this step the day before you plan on making the gnocchi.

Step 2 (the day you plan on eating the gnocchi): Making the gnocchi dough.

To make great gnocchi, the ricotta has to be fairly smooth. Place the drained ricotta in a large bowl and mash it as best as you can with a rubber spatula or a large spoon (it’s best to use a utensil with some flexibility here). As you mash the ricotta, if you noticed that you can still see curds, then press the ricotta through a strainer to smooth it out as much as possible.

Add the lightly beaten eggs to the mashed ricotta.

Melt the tablespoon of butter. As it melts, add in the sage if you’re using it. If not, just melt the butter and add it to the ricotta mixture.

Add in any flavouring that you’re using (i.e., nutmeg, lemon zest, etc.). If you’re not using any particular flavouring, that’s fine.

Add the Parmigiano-Reggiano and the salt.

Beat all the ingredients together very well. You should end up with a soft and fluffy batter with no streaks (everything should be mixed in very well).

Step 3: Forming the gnocchi.

Fill a small pot with water and bring to a boil. When it boils, salt the water generously and keep it at a simmer. You will use this water to test the first gnocchi that you make to ensure that it holds together and that your gnocchi batter isn’t too damp.

In a large, shallow baking dish or on a sheet pan, make a bed of all-purpose flour that’s ½ an inch deep.

With a spatula, scrape the ricotta mixture away from the sides of the bowl and form a large mass in the centre of your bowl.

Using a tablespoon, scoop up about 2 to 3 teaspoons of batter and then holding the spoon at an angle, use your finger tip to gently push the ball of dough from the spoon into the bed of flour.

At this point you can either shake the dish or pan gently to ensure that the flour covers the gnocchi or use your fingers to very gently dust the gnocchi with flour. Gently pick up the gnocchi and cradle it in your hand rolling it to form it in an oval as best as you can, at no point should you squeeze it. What you’re looking for is an oval lump of sorts that’s dusted in flour and plump.

Gently place your gnocchi in the simmering water. It will sink and then bob to the top. From the time that it bobs to the surface, you want to cook the gnocchi until it’s just firm. This could take 3 to 5 minutes.

If your gnocchi begins to fall apart, this means that the ricotta cheese was probably still too wet. You can remedy this by beating a teaspoon of egg white into your gnocchi batter. If your gnocchi batter was fluffy but the sample comes out heavy, add a teaspoon of beaten egg to the batter and beat that in. Test a second gnocchi to ensure success.

Form the rest of your gnocchi. You can put 4 to 6 gnocchi in the bed of flour at a time. But don’t overcrowd your bed of flour or you may damage your gnocchi as you coat them.

Have a sheet pan ready to rest the formed gnocchi on. Line the sheet pan with wax or parchment paper and dust it with flour.

You can cook the gnocchi right away, however, Judy Rodgers recommends storing them in the refrigerator for an hour prior to cooking to allow them to firm up.

Step 4: Cooking the gnocchi.

Have a large skillet ready to go. Place the butter and water for the sauce in the skillet and set aside.

In the largest pan or pot that you have (make sure it’s wide), bring at least 2 quarts of water to a boil (you can use as much as 3 quarts of water if your pot permits). You need a wide pot or pan so that your gnocchi won’t bump into each other and damage each other.

Once the water is boiling, salt it generously.

Drop the gnocchi into the water one by one. Once they float to the top, cook them for 3 to 5 minutes (as in the case with the test gnocchi).

When the gnocchi float to the top, you can start your sauce while you wait for them to finish cooking.

Place the skillet over medium heat and melt the butter. Swirl it gently a few times as it melts. As soon as it melts and is incorporated with the water, turn off the heat. Your gnocchi should be cooked by now.

With a slotted spoon, remove the gnocchi from the boiling water and gently drop into the butter sauce. Carefully roll in the sauce until coated. Serve immediately.

Variations: For the gnocchi, you can flavour them however you wish. If you want to experiment by adding something to your gnocchi (i.e., caramelized onion, sundried tomato), feel free to do so. However, be forewarned, ricotta gnocchi are delicate and may not take well to elaborate additions. For the sauce, this is your chance to go nuts. Enjoy yourselves. Surprise us!!!

Freezing the gnocchi: If you don’t want to cook your gnocchi right away or if you don’t want to cook all of them, you can make them and freeze them. Once they are formed and resting on the flour-dusted, lined tray, place them uncovered in the freezer. Leave them for several hours to freeze. Once frozen, place them in a plastic bag. Remove the air and seal the bag. Return to the freezer. To cook frozen gnocchi, remove them from the bag and place individually on a plate or on a tray. Place in the refrigerator to thaw completely. Cook as directed for fresh gnocchi.